SQL basics 5
Adding new rows to table (INSERT)
- INSERT statement is used for adding new rows to the table
- INSERT has two possible syntaxes:
INSERT INTO Table VALUES (1,'val1','val2','val3');
INSERT INTO Table (col2,col3,col4) VALUES ('val1','val2','val3');
- First example presented above does not include column listing in INSERT statement and thus requires the insertion for all columns
- In second example columns are defined before VALUES clause and values given inside brackets after VALUES clause will be inserted corresponding order
- Second syntax is useful especially in cases where table has automatic fields like AUTO_INCREMENT and TIMESTAMP (values will not be inserted manually for these fields!)
- Multiple rows can be added with one INSERT statement by separating bracket pairs with comma (,)
- Below is an example where three rows are inserted into the Worker table
insert into Worker VALUES
(1,'James','Sales','james@company.com','5124533112', 2900, 2),
(2,'Cheryl','Management','cheryl@company.com','5125244212', 2850, 3),
(3,'Jessie','Research','jessie@company.com','5125264231', 3200, 2);
Copying data from one table to another
- Data can be copied from table to another by combining INSERT and SELECT statements
- Important: Table structures must be similar (same amount of columns with similar data types in similar order)
- Below is an example where data is copied between two tables
Example
Copy data of employee with ID of 20 to MANAGER table.
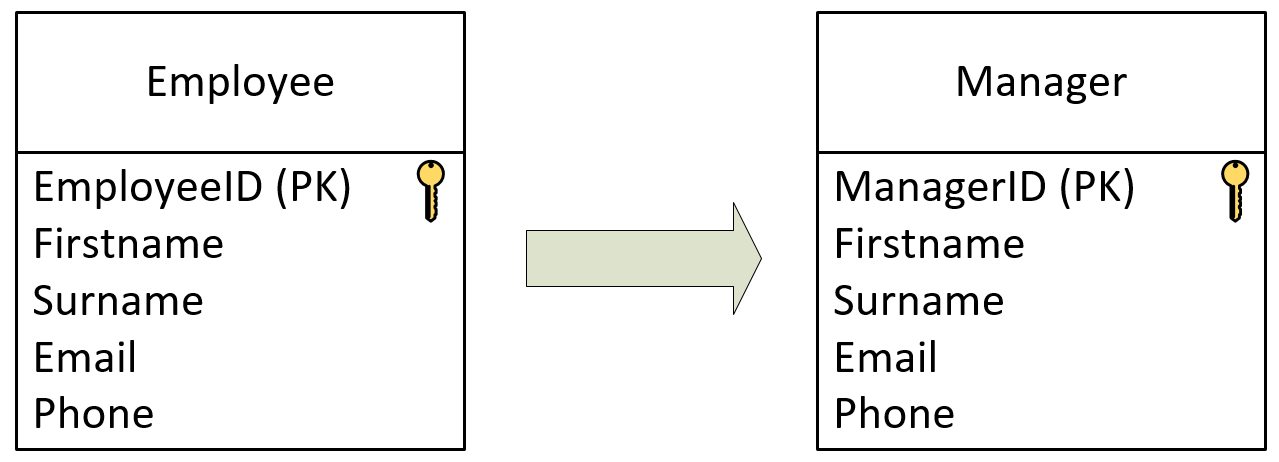
INSERT INTO Manager (firstname, surname, email, phone)
SELECT firstname, surname, email, phone
FROM Employee
WHERE EmployeeID = 20;
Update table data (UPDATE)
- Existing data in tables can be edited with UPDATE statement
- Example for UPDATE statement syntax is shown below
UPDATE Table_name
SET field_name = new_value
WHERE id = id_value;
- UPDATE requires row selection (WHERE) by default
- This is important especially in production environment where user can accidentally affect wrong rows
- In row selection, these rules should be taken into account:
- For one row, use unique row identifier
- For several rows, try to find a common factor for all desired rows
- Below are couple of examples where company worker data is edited
Example 1
Change James's (ID = 1) priority value from 2 to 3.
UPDATE Worker
SET Priority = 3
WHERE ID = 1;
Example 2
Increase salary for all workers in Management for 10 percent.
UPDATE Worker
SET salary = salary * 1.1
WHERE department = 'Management';
- It is also possible to update multiple values in the target row
- This can be done by separating the targets with comma in SET command
Example 3
Update the address and last name of Jessica Miller so that a new value of address will be Nottingham st 14 and last name will be Davis.
UPDATE Worker
SET address = 'Nottingham st 14', lastname = 'Davis'
WHERE ID = 8;
Delete table data (DELETE)
- DELETE statement is used for deleting data from table
- Similar to UPDATE statement, row selection (WHERE) is required in order to avoid accidental data removal
Example
Remove employee with ID of 2 from Worker table.
DELETE FROM Worker
WHERE ID = 2;
Transactions
- Transactions allow user to execute multiple SQL operations on one statement
- If one of the queries included in transaction fails, rollback operation is executed in order to restore the database to its original state
-
Transaction properties can be described with ACID:
- Atomicity: Each SQL query included in transaction must work or the whole operation will be restricted
- Consistency: Database structure and content is modified according to successful transaction
- Isolation: Each SQL query included in transaction is executed individually
- Durability: Modifications made with successful transaction will be permanent, even after system malfunction
-
Transaction always starts with BEGIN and ends with COMMIT statement
Example
Below is an example where three SQL queries are included in transaction.
- Insert new worker to Worker table
- Set salary for existing worker
- Change Phone column data type (CHAR(10) → VARCHAR(10))
BEGIN;
INSERT INTO Worker VALUES (4,'Jones','Research','jones@company.com','5125331231',2,2900);
UPDATE Worker SET Salary = 3100 where WID = 2;
ALTER TABLE Worker MODIFY COLUMN Phone VARCHAR(10);
COMMIT;
- Important: If COMMIT is left out from the end, changes are only present during the current session!
- ROLLBACK command can be used to restore database to its original state
- Important: This command does not work if COMMIT has been executed!
- By default AUTOCOMMIT setting is enabled meaning that COMMIT is executed after each SQL query (1 = Enabled, 0 = Disabled)
- To check AUTOCOMMIT setting value, use the following query:
SELECT @@autocommit;
- AUTOCOMMIT can be disabled with the following query:
SET @@autocommit = 0;
Views
- View in SQL can be described as a variable which stores the query statement
- By using the view, user will always receive up to date data from the database
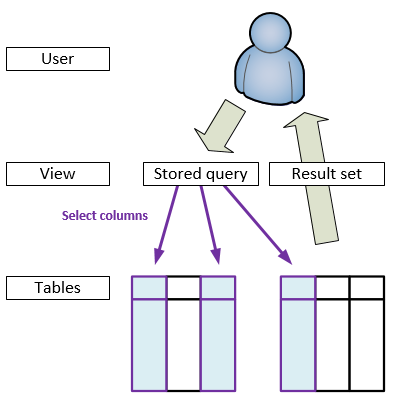
- The most useful cases for the view are complicated and long SQL queries
- View is created with CREATE VIEW statement
- Basically the syntax combines alias (AS) and data selection (SELECT)
- When querying the created view, ORDER BY can be used with the view
- Below are couple of examples for using a view
Example 1
Create a view for the following query: Select all workers whose salary is over 3000 and who work on research.
CREATE VIEW work AS
SELECT Name, Email, Phone, Salary
FROM Worker
WHERE Salary > 3000 and Department = 'Research';
Now this query can be used with the following SELECT statement:
SELECT * FROM work;
Example 2
Create a view for the following query: Select project ID, name, priority, total hours and the difference of planned and actual hours grouped for each project.
CREATE VIEW project_situation AS
SELECT PR.projectID, PR.name, PR.priority, SUM(PW.hours), SUM(PH.hours_planned) - SUM(PH.hours)
FROM Project PR LEFT JOIN Workers PW
ON PR.projectID = PW.projectID
GROUP BY PR.projectID, PR.name, PR.priority;
Now this query can be used with the following SELECT statement:
SELECT *
FROM project_situation
ORDER BY projectID;