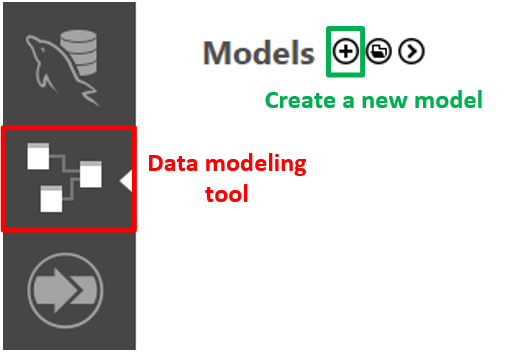
In this section we see how new tables can be added and setup in the diagram.
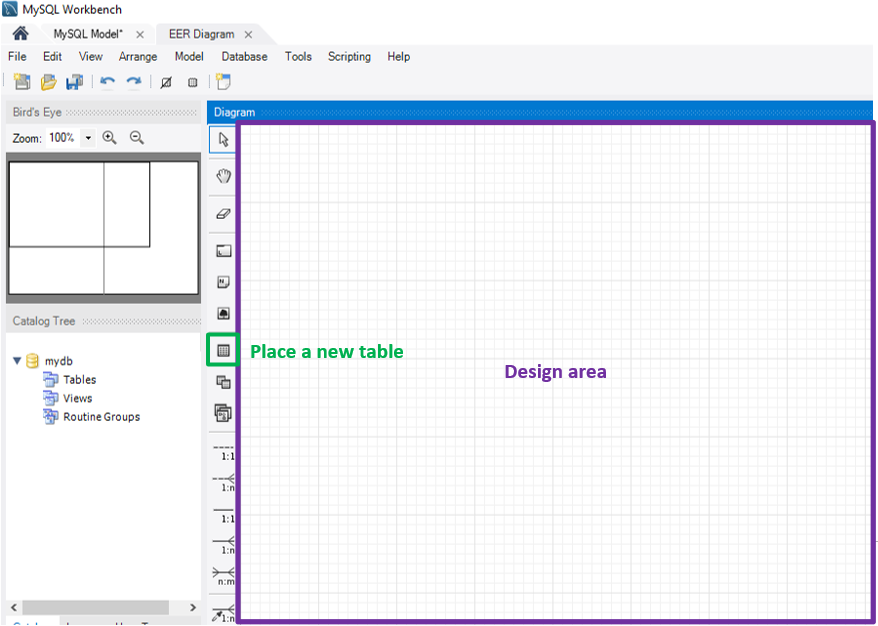
Add a new table by clicking Place a New Table button from the left toolbar or use keyboard shortcut by pressing t and then click on the diagram.
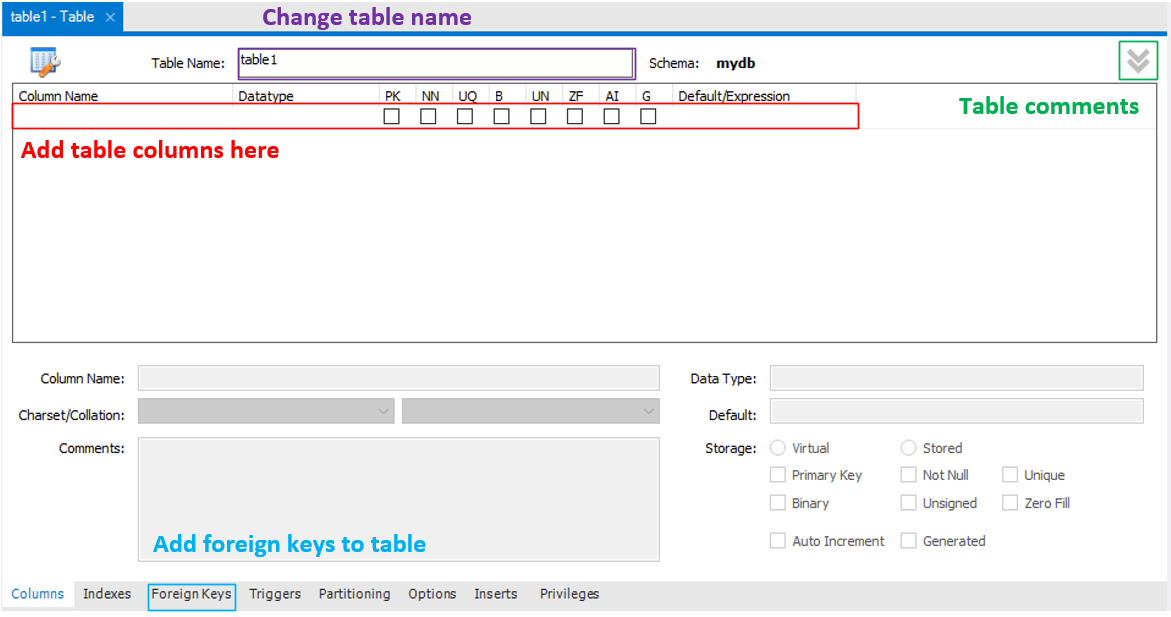
Open table properties window by double clicking its name in the diagram.
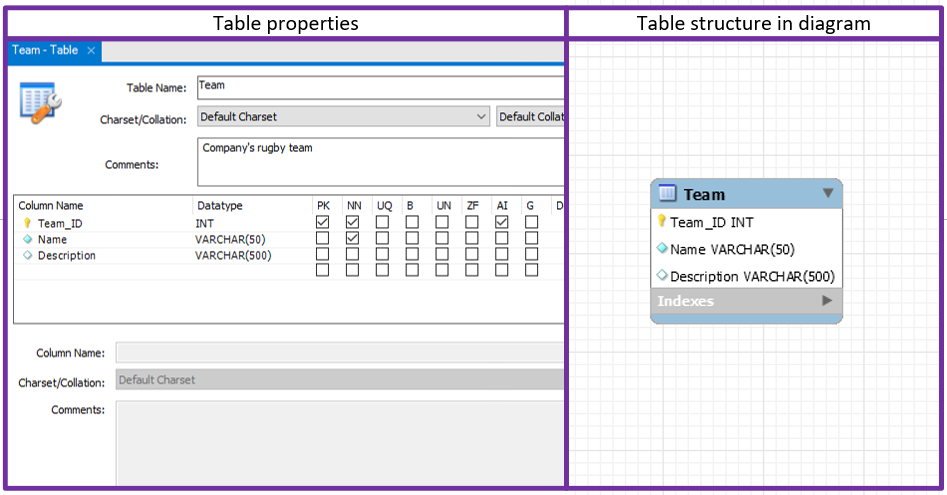
You should now see table properties window like presented in the picture below (The most important areas are marked in the picture).
Important: Table names and table columns should not include any special characters (for example scandinavian characters åäö) and no spaces (for example 'team name' should be 'team_name')!
Use preferably only the alphabetical characters a-z and '_' or '-' characters if needed.
Each column should be given at least a name and datatype (see information about datatypes here).
Column options:
PK (Primary Key): Primary key column (each table should have at least one and it is usually the first listed column)
NN (Not Null): Set column values to be required so fields in this column cannot be left empty when inserting data
UQ (Unique index): All values in the column must be unique (no duplicate values allowed!)
B (Binary): Data will be stored as binary strings
UN (Unsigned data type): Only nonnegative numbers are allowed in the column
ZF (Zero fill): Values will be filled with zeroes if numeric
AI (Auto incremental): Will automatically generate a new integer for each new line
G (Generated column): Columnn values will be generated from predefined expressions
Default/Expression: Default value for the column can be set and will be used if no value will be given during the data insertion
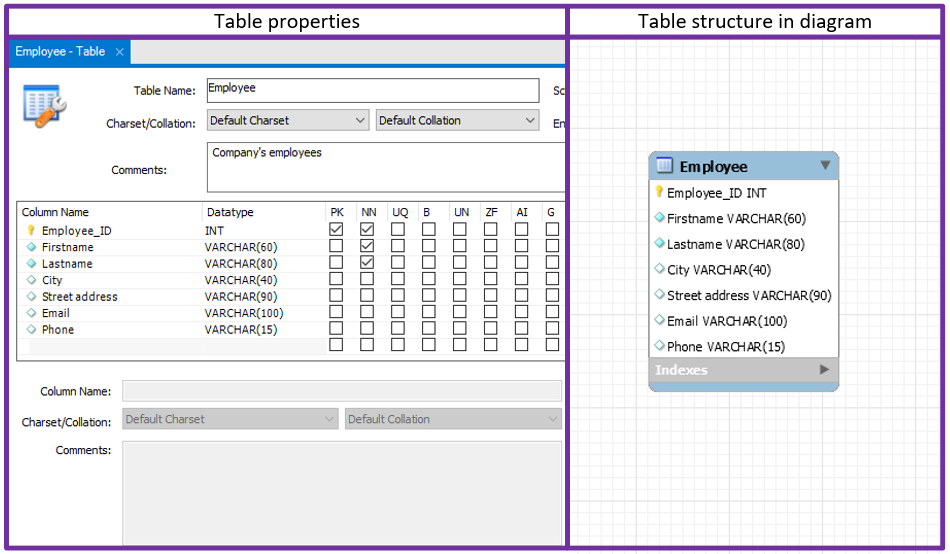
Let's create an example table like shown in the picture below.
This table has now the following properties:
Name: Employee
Comment: Company's employees
Columns:
Employee_ID (Datatype: Integer, Primary key for the table)
Firstname (Datatype: Variable character (max length 60), Required field)
Lastname (Datatype: Variable character (max length 80), Required field)
City (Datatype: Variable character (max length 40), Optional field)
Street address (Datatype: Variable character (max length 90), Optional field)
Email (Datatype: Variable character (max length 100), Optional field)
Phone (Datatype: Variable character (max length 15), Optional field)
Important: Employee_ID, Firstname and Lastname are prepared with Not null setting and this means that when a new line would be inserted to this table in the future, at least these fields must be inserted!
Now that we have one table, let's create another (see picture below).
Before connecting two entities (in this case tables) in database model, we need to identify the type of connection that is to be formed between tables.
There are three options:
One-to-one
One-to-many
Many-to-many
In order to identify the connection type, let's read the relationship of our two entities in both directions like this:
Can one employee play in many teams? → No
Can one team have many employees? → Yes
If we would have answered No to both, the connection type would have been one-to-one since only one employee would play in one team.
On the other hand, if we would have answered Yes to both, the connection type would have been many-to-many since one employee could play in many teams and one team would have many employees as members.
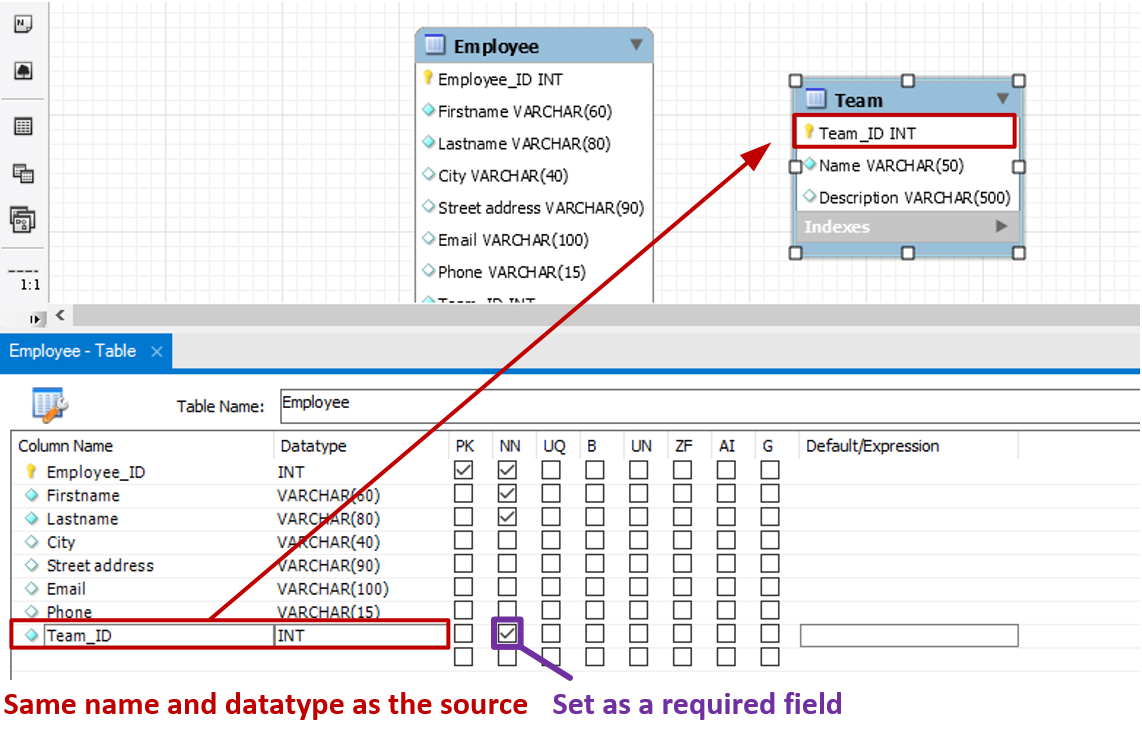
Now that we know the connection type (one-to-many), we create this connection by bringing Team_ID field as a foreign key to the Employee table.
This way when we insert new employee to the table, team_ID is inserted as well and then we can tell in which team this particular employee belongs to.
Follow the guide below to connect the tables.
Create a new column for the foreign key (could be with same or different name than the source and must have the same datatype as the source).
We know that we are going to retrieve the Team_ID field from Team table so let's create a new column like shown in the picture below.
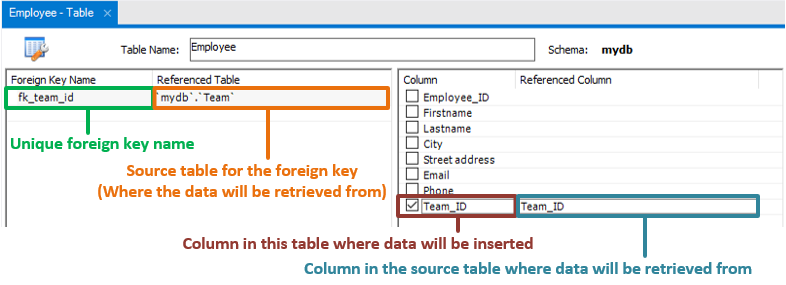
Open Employee table properties and click the Foreign Keys tab from the bottom.
The fields in this view are described like this:
Foreign key name: Give your foreign key an unique name (this name can only exists once in the entire data model)
Referenced table: From what table will the foreign key value be retrived into this table?
Column: What column in this table will the foreign key value be inserted in?
Referenced Column: From what column in the referenced table will the value be retrieved from?
Let's create a new foreign key with values shown in the example below.
Finally let's set the foreign key options.
These options will be described like this:
On Update: What will be done to the Team_ID field value when this value is changed in the source table (in this case Team table)?
On Delete: What will be done to the Team_ID field value when this value is deleted from the source table (in this case Team table)?
The values for these options are
NO ACTION: Nothing will be done to foreign key value.
SET NULL: Foreign key value will be set Null (Important: Cannot be used if column has Not Null option set!)
CASCADE: Changes in the source table will be updated to destination table.
RESTRICT: If there are one or more instances of this value in the destination table, changes cannot be made.
On our case we would check the following options:
On Update: Cascade → If Team_ID value will be updated in Team table, all occurrences of this value will be updated in Employee table too.
On Delete: Restrict → Team_ID value cannot be deleted from Team table if there is at least one employee belonging to that team. Set null value could be used here as well, which would remove the Team_ID value from rows it is placed. However, if this would be our choice, we would also need to remove Not Null option from the field since Null value cannot be added otherwise.
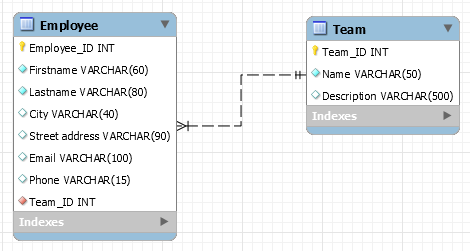
We will now have the connection between these two tables like shown below.
In this section we take a look how we can create a new database from our database model.
Follow the guide below to perform this operation.
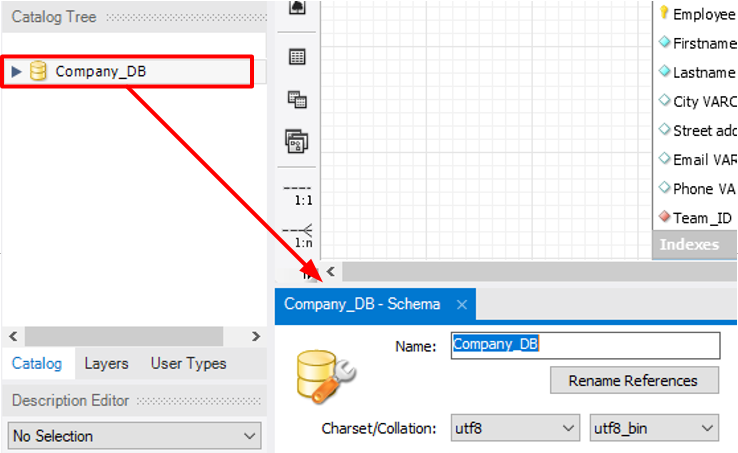
First, change the name of the database in your model by double clicking the database icon under the Catalog Tree section. Input a new name in the Name field (see picture below).
Next, from the top of the window select Database → Forward Engineer....
You should now see the Forward Engineer to Database window. Use these settings:
Connection Options: Select your previously stored connection from the dropdown list (If you are using XAMPP, make sure your MySQL service is running!) and click Next.
Options: Leave these to default values and click Next.
Select Objects: Leave these to default values and click Next.
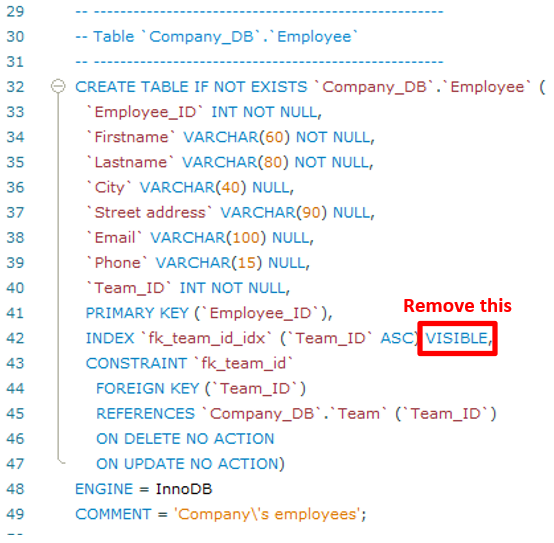
Review SQL Script: If you are using MySQL server in XAMPP, remove all VISIBLE commands from the script content to ensure compatibility (see example below) and click Next. Important: Leave commas (,) at the end of the lines when removing VISIBLE commands!
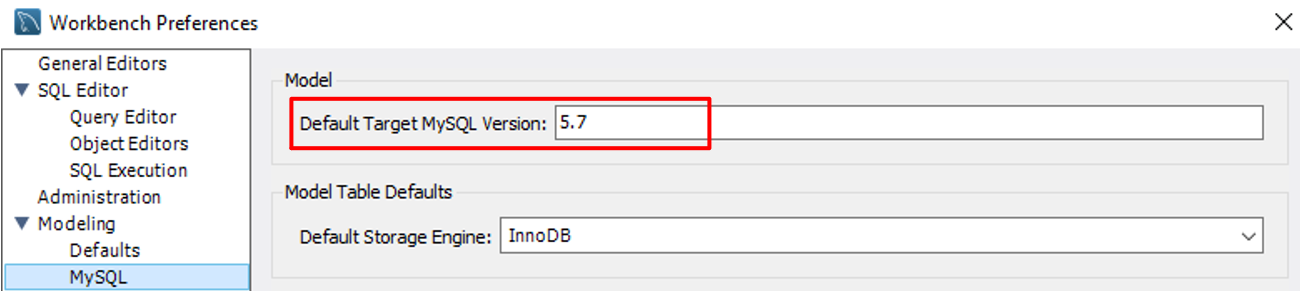
There is also a permanent fix for this:
In MySQL Workbench select Edit → Preferences.
From the left menu select Modeling → MySQL.
Set the value to be 5.7 (see example image below).
If all four phases were successful, you should now have a new database countaining tables Employee and Team in your database server.