SQL basics 4
Creating a database
- Database can be created with command CREATE DATABASE
- Database name will be given after the command (for example CREATE DATABASE testdb)
- User must have adequate rights for creating the database
- Before user can execute any queries, database must be selected with USE command (for example USE testdb)
- Database can be deleted with DROP DATABASE command followed by database name, for example DROP DATABASE development;
Creating a table
- Like with creating a database, table creation also requires adequate rights
- After selecting the database with USE command, table can be created with the following syntax:
CREATE TABLE table_name(
ID INT NOT NULL,
Col1 VARCHAR(20),
Col2 VARCHAR(35),
Col3 VARCHAR(40),
PRIMARY KEY (ID));
- Table name will be given after CREATE TABLE command
- Table structure is presented inside brackets
- Each column requires name and data type
-
In addition, constraints can be defined for each column:
- NOT NULL: Null value not allowed
- DEFAULT: If no value is provided during INSERT statement, default value will be used
- UNIQUE: No duplicate values are allowed in column
- PRIMARY KEY: Define the primary key column(s) for the table
- FOREIGN KEY: Define foreign key column(s) for the table
-
Supported data types for columns can be seen for example in here
-
Table can be deleted with DROP TABLE command followed by table name, for example DROP TABLE Worker;
Creating a table copy
- Table can be copied with like presented in the example below
CREATE TABLE table_name LIKE source_table;
- As can be seen from the example, this is a combination of CREATE TABLE command and LIKE command used previously in string functions
- Important: This will only copy the table structure, not the possible data in the source table!
Referential integrity
- Connections between tables using foreign keys are essential for keeping data integrity in appropriate level
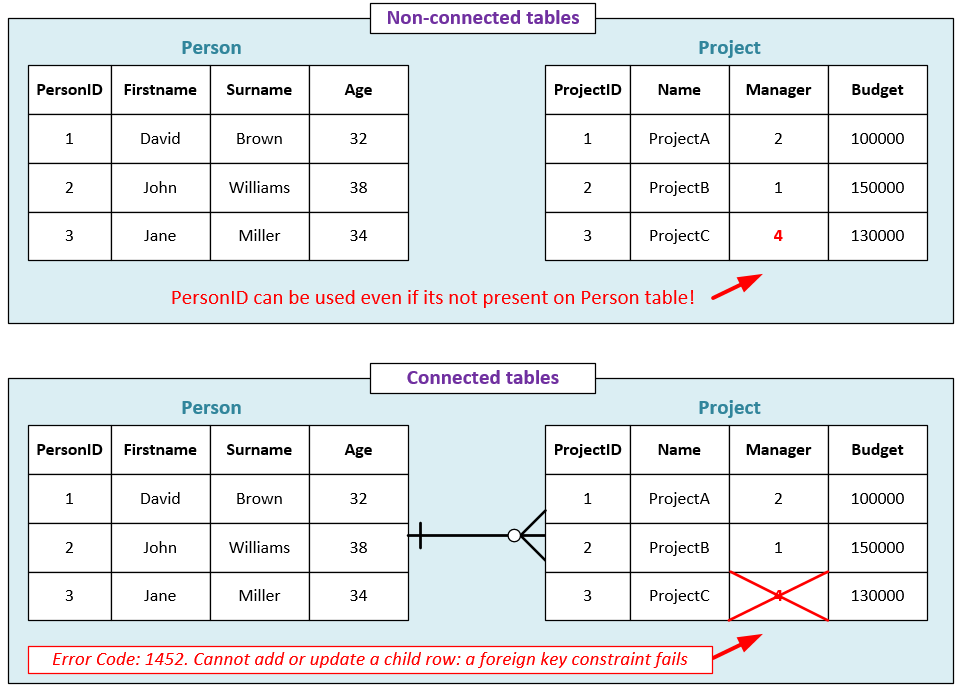
- Below is an example where the difference between connected and non-connected tables is shown
-
As can be seen from the example above:
- In case where tables are not connected, data integrity cannot be ensured
- ID 4 was stored in the Manager column even though it was not present in the Person table
- In case of connected table, ID 4 cannot be used for the row since it is not present in Person table
- This means that the insertion of third row or update for the existing Manager value cannot be completed
-
The create statements for these two tables would be like this:
CREATE TABLE Person(
PersonID INT NOT NULL,
Firstname VARCHAR(25),
Surname VARCHAR(35),
Age INT,
PRIMARY KEY (PersonID));

CREATE TABLE Project(
ProjectID INT NOT NULL,
Name VARCHAR(30),
Manager INT NOT NULL,
Budget INT,
PRIMARY KEY (ProjectID),
FOREIGN KEY (Manager)
REFERENCES Person (PersonID));
Referential constraints
- As stated before, connections between tables help to ensure that data integrity is in place
- However, the management of the data can be frustrating without referential constraints
- Basically referential constraint means that we can configure how the database engine will react to data changes automatically
- This will be presented in the example below
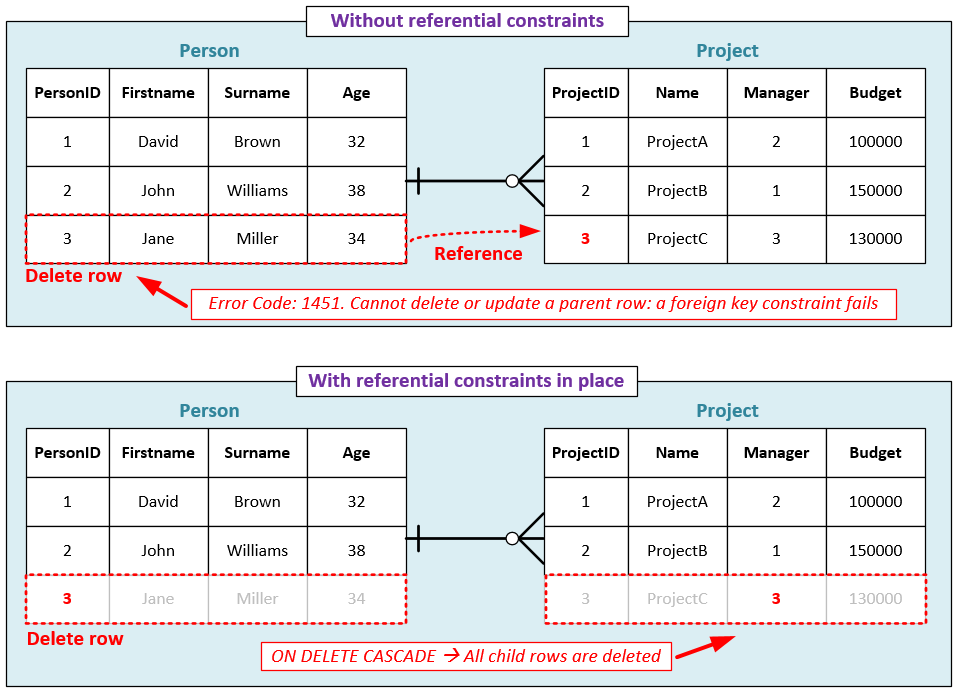
- There are two options for reacting data changes:
- ON UPDATE: What to do when table data is updated
- ON DELETE: What to do when table data is deleted
- Both of these options have four possible clauses to choose from:
- RESTRICT: Row will not be deleted or updated if there are records in the child table
- NO ACTION: Equivalent to RESTRICT
- CASCADE: Rows in child table will be automatically updated or deleted when corresponding values are affected in parent table
- SET NULL: Row in the child table will be set null when corresponding value in the parent table is updated or deleted
Automatically generated unique field numbers (AUTO_INCREMENT)
- AUTO_INCREMENT can be used for automatic value generation for the key field in table
- Only one can be used for each table and it must be a key field
- Basically it creates a unique integer for the field
- This is especially useful to use with numberic ID fields used as primary key fields
- By default AUTO_INCREMENT starts from number 1 and will increase by 1 for each new record
CREATE TABLE Test(
ID INT NOT NULL AUTO_INCREMENT,
col1 VARCHAR(20),
col2 VARCHAR(30),
PRIMARY KEY (ID));
- Important: AUTO_INCREMENT starting value can also be set after the creation of the table using ALTER TABLE statement!
- Starting value can be customized like in the example below
ALTER TABLE Test AUTO_INCREMENT=10;
- This setting will change the starting value of AUTO_INCREMENT in ID field to be 10.
- Now the first line to be inserted would receive an ID value of 10, next will have 11 and so on.
Edit table properties (ALTER TABLE)
- Table properties can be edited after CREATE TABLE statement by using ALTER TABLE
-
There are many options available for ALTER TABLE statement, but we'll cover the most essential ones here:
- ADD COLUMN: Add new column to the table
- DROP COLUMN: Drop an existing column from table
- MODIFY COLUMN: Edit column properties (name, data type)
- RENAME TABLE: Change table name
- ADD CONSTRAINT: Add constraint for the table
-
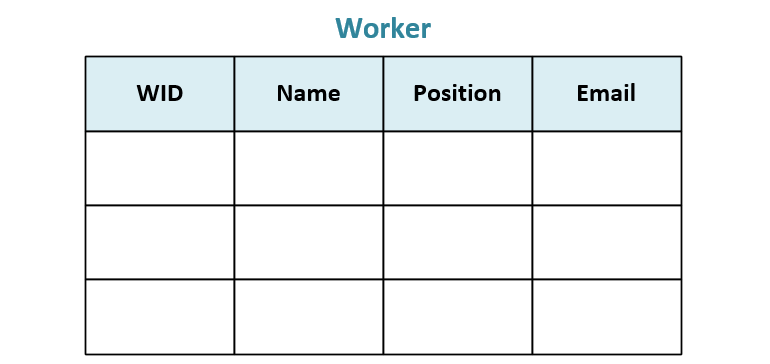
It is possible to make multiple changes with one ALTER TABLE statement like in the example below
CREATE TABLE Worker(
WID int,
Name VARCHAR(40),
Position VARCHAR(25),
Email VARCHAR(60));
- Now let's make the following changes for the Worker table:
- Set WID column as a primary key
- Add new column Phone with data type of CHAR(10)
- Add new column Priority with data type of VARCHAR(10) with default value of normal (this value will be set for the row if no priority value is given during data insertion)
- Change the data type for the Name column (VARCHAR(40) → VARCHAR(50))
ALTER TABLE Worker
ADD PRIMARY KEY (WID),
ADD COLUMN Phone CHAR(10),
ADD COLUMN Priority VARCHAR(10) DEFAULT 'normal',
MODIFY COLUMN Name VARCHAR(50);
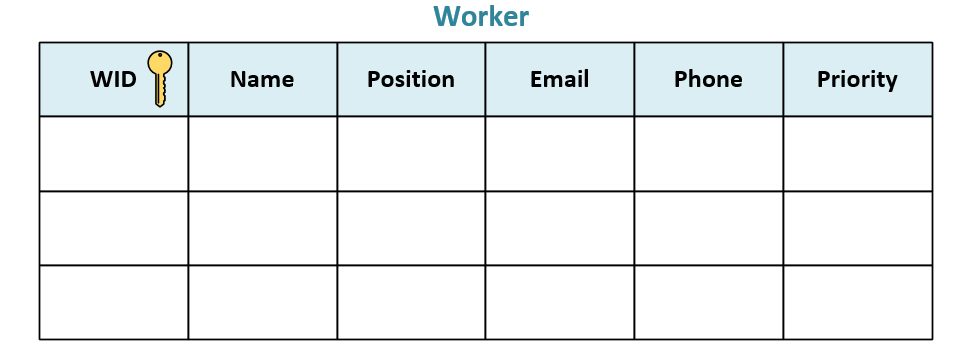
Table description (TABLE)
- Existing table properties can be listed with DESCRIBE followed by table name
- Below is an example where previously created Worker table properties are listed
DESCRIBE Worker;
- This will result the following output:
+------------+-------------+------+-----+---------+-------+
|  Field     |    Type     | Null | Key | Default | Extra |
+------------+-------------+------+-----+---------+-------+
| WID        | int(11)     | NO   | PRI | Null    |       |
| Name       | varchar(50) | YES  |     | Null    |       |
| Department | varchar(25) | YES  |     | Null    |       |
| Email      | varchar(60) | YES  |     | Null    |       |
| Phone      | char(10)    | YES  |     | Null    |       |
| Priority   | varchar(10) | YES  |     | Null    |       |
Input and update validation
- Input values and updates targeted to table can be checked before allowing the execution of query
- Values must meet the set conditions in order for input or update query to execute
- Below is an example where values for Priority field are checked on INSERT statement for Worker table
DELIMITER $$
CREATE TRIGGER check_priority BEFORE INSERT ON Worker
FOR EACH ROW
    BEGIN
        IF NEW.Priority <> 'high' AND NEW.Priority <> 'low'
            THEN SET NEW.Priority = 'unknown';
        END if;
    END $$
- As can be seen from the example above, only Priority field values high and low are allowed
- Like shown in earlier examples, if no value is provided during the data insertion on Worker table, value normal will be used
- However, now field value will be set to unknown if value to be inserted is something else than high or low
- Another example would be the case where the inserted values would be restricted if given conditions are not met
- Below is an example where price values below zero (0) are checked
DELIMITER $$
CREATE TRIGGER check_price BEFORE INSERT ON Product
FOR EACH ROW
    BEGIN
        IF NEW.Price < 0 THEN
            SIGNAL SQLSTATE '45000'
            SET MESSAGE_TEXT = 'The price you gave was below zero and thus this product data cannot be inserted!';
        END if;
    END $$
- Trigger can be removed with DROP TRIGGER name where name is the name of the trigger
- For example if we would like to remove the previously created trigger for price check the following command would do this:
DROP TRIGGER check_price;